Setting Up A Virtualised (Linux) Empire on Apple Silicon

I recently started an awesome new role as a Sr. Security Researcher (yay me) and as a work from home position this came with the perk of picking some shiny new work kit; with the two main contenders being a new Dell Precision or a MacBook Pro.
In my infinite wisdom (read: hubris), of course I opted for the new MacBook Pro - after all, with all the headlines and buzz, I wanted to see what this M1 fuss was all about!

The panic started to set in, had I made a horrific decision? In getting caught up in the hype and excitement I’d forgotten the implications of switching my workflow to a completely different architecture, and one as new as Apple’s Silicon.
However, after some time researching, tweaking and debugging I’m now in a position where I can happily say I have no regrets moving to Apple Silicon and in fact am beginning to see what the hype is all about! Of course, this isn’t to say the grass really is perfectly green on the other side, there are still issues, particularly due to it’s infancy, but more on that soon!
So without further ado, below is the culmination of moments of bewilderment, exasperation and elation as I transitioned my workflow as a Linux security researcher from Linux x86_64 to MacOS aarch64.
Contents
- My Virtualised Empire
- Virtualisation Options on M1
- UTM: A Whistle-stop Tour
- Aarch64 Guests
- x86_64 Guests
- Performance
- Weirdness
- Networking
- Kernel Debugging with GDB
- Host-Guest
- Guest-Guest
- Also, No GDB on HVF
- Resizing Disks
- Conclusion
My Virtualised Empire
So, turns out the title might have been a little clickbaity, as my virtual empire is more of a virtual hamlet. Before I take any more of your time, take a look at the diagram below:
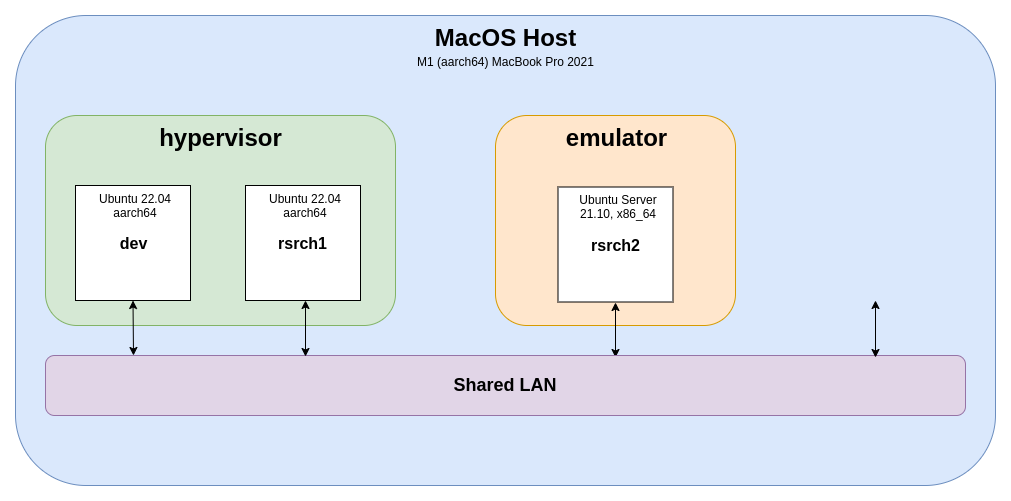
This is the general gist of what I set out to, and outline how to, achieve in this post. As a security researcher and Linux enthusiast there we a couple of important factors:
- I want a ‘dev’ guest that would run Linux and be my main development workhorse; this is where I’d be spending a lot of time so performance is key
- I need to be able to spin up a variety of ‘research’ guests; likely short lived and many so ease of setup is important
- Speaking of variety, I need to be able to spin up guests running on difference architectures, specifically aarch64 (native) and x86_64 (emulated)
- Finally, I break things … often. So debugging is important too! While not strictly relevant to the overarching topic of virtualisation, I’ll touch on this briefly
And, well, that’s about it! If this sounds of any interest to you, feel free to continue reading as I outline how I achieved this setup, the thought process behind some of my choices and likely most relevant are some of the gotchas I encountered along the way.
Virtualisation Options on M1
Before receiving my MacBook Pro, I primarily worked in Linux environments and my virtualisation software of choice was VMWare Workstation. Moving to MacOS, I wasn’t sure what the virtualisation ecosystem was like.
Unsurprisingly VMWare was still a big name, with their MacOS software hypervisor Fusion being popular. However, it wasn’t the only contender. Parallels is also another popular choice for virtualisation on MacOS. Slightly less in the limelight were VirtualBox and QEMU-based UTM.
I won’t bore you with a breakdown of the various features, pros and cons for each of these products because in the end it was an extremely simple decision. Mainly due to the fact that UTM is the only one (at the time of writing) that meets all my criteria above.
As far as I know, VMWare and Parallels have no plans to support x86_64 emulation on M1’s and VirtualBox doesn’t have any kind of M1 support yet. See? Easy!
UTM: A Whistle-stop Tour

UTM is another virtualisation software built specifically for Apple products. What’s really neat about UTM for my criteria is that it’s built on top of QEMU. For those that haven’t heard of it, QEMU is a free and open-source hypervisor. In particular:
- UTM can use Apple’s hypervisor framework[1] to virtualise aarch64 guests at near native speeds, which is great for my dev box!
- Furthermore, UTM provides the option to use QEMU’s Tiny Code Generator (TCG)[2] which allows us to emulate different architectures (at a significant performance cost)
- For those that have used QEMU in the past, UTM provides an amazingly simplified yet flexible front-end for the deluge of different parameters QEMU can take
- By using QEMU, we have access to the gdbstub QEMU employs for kernel-level debugging (with caveats below)
For people reading this near time of publication, I heartily recommend using the UTM 3.0.0 (beta) release which can be found here. It adds some important features, as well as some neat quality of life improvements.
Aarch64 Guests
Okay, let’s start off with the simplest setup. If you have no architecture requirements, you definitely want to run an aarch64 guest to match your M1 host’s architecture. This allows you to make full use of Apple’s hypervisor framework and get the best performance.
In terms of guest OS, you’ll need to make sure you’re running an arm64/aarch64 build! Unfortunately the demand is still scaling up for these, so you may find your favourite distro might not have support for this. I made do with Ubuntu 22.04 Jammy, as they have a aarch64 desktop build handy[1]. For Arch users, there’s also ArchLinux ARM.
For setup, it’s really as simple as following the UTM setup wizard[2]. The main thing to remember is that we want to choose “Virtualise” as we don’t need to emulate another architecture. Other than that, it’s all fairly straightforward. No tweaks needed!
- https://cdimage.ubuntu.com/daily-live/current/
- Requires UTM 3.0.0+
x86_64 Guests
Moving on, now we’ve got our dev guest up, what if we want to do some x86_64 activities? Again, using the UTM wizard we’ll want to this time select “emulation” and proceed with the rest of the wizard, so far so good!
Now for the bad news, in order to emulate another architecture we need to use TCG, QEMU’s Tiny Code Generator. Unsurprisingly emulating a completely different CPU architecture is a lot slower than using the native hypervisor we were able to previously.
Performance
To mitigate the impact of this, there’s a few things we can do:
- Avoid GUIs where possible! That’s right, pick up a server edition or something
- If you must, be stingy on resolution where possible; in the
VM settings -> "Display", consider the graphics type and disabling retina mode - Go into
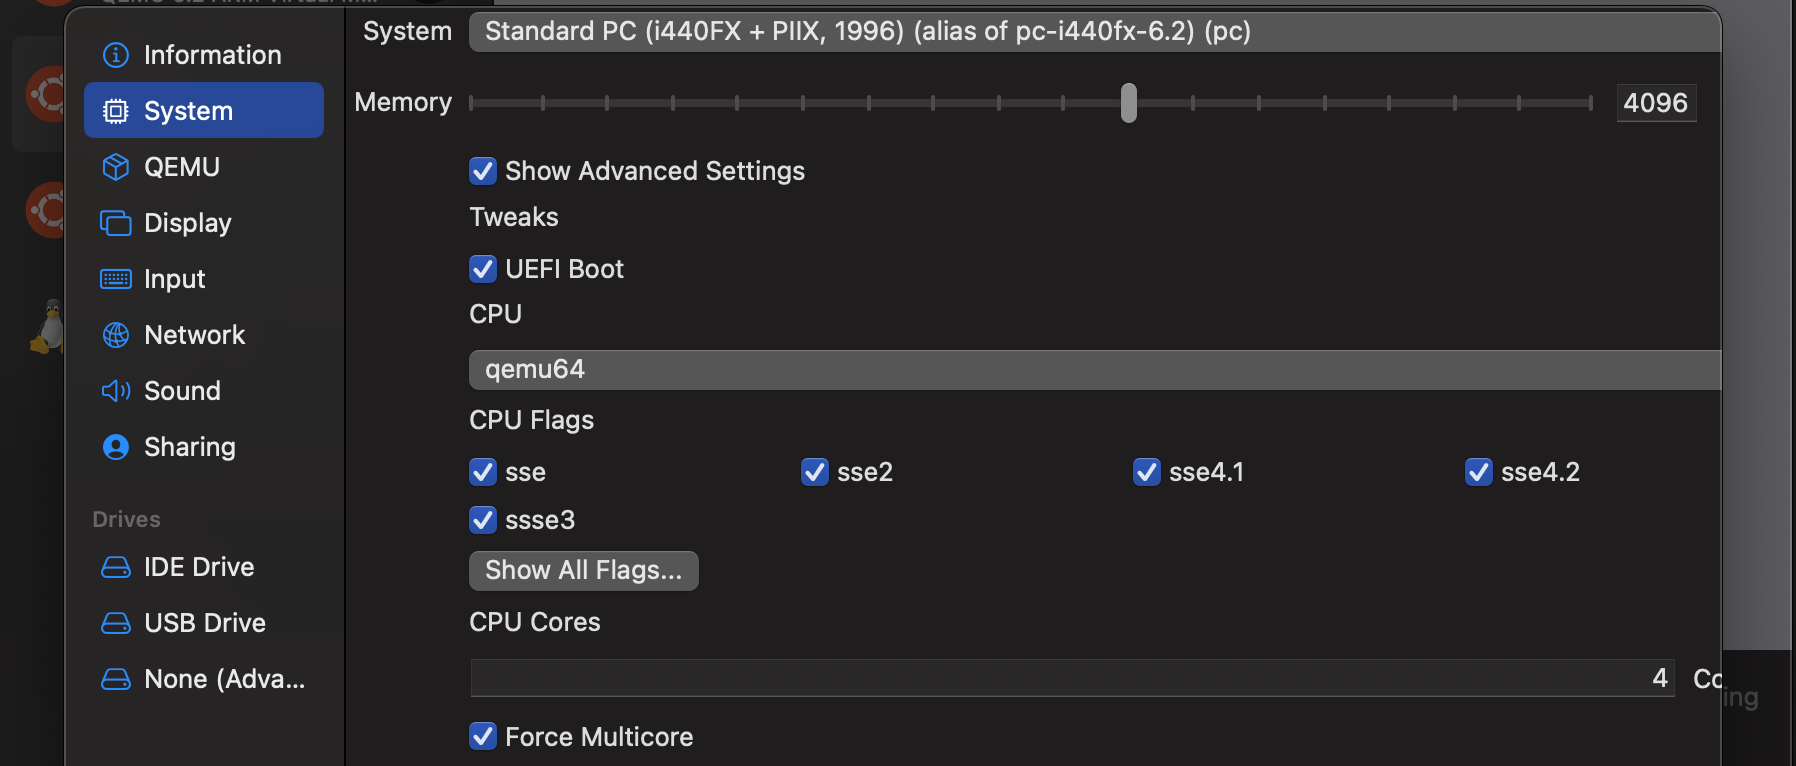
VM settings -> "System" -> "Show Advanced Settings"and make sure to up the cores if possible and check “Force Multicore”; on x86_64 at least this is seen to have marked improvements on perf - In the same section as above, I’d also recommend the
qemu64CPU for best compatibility results unless you have specific requirements
Weirdness
Again, unsurprisingly, weird things can crop up when running a fully-fledged Linux operating system on an emulated architecture, and I mean WEIRD. Programs not working? System errors popping up? Kernel panics?
This could be a result of missing “CPU Flags”, under the VM settings -> "System" -> "Show Advanced Settings". Yep, there’s a lot. Over the years these have accumulated and you might find that some x86_64 instructions that are being run in your guest might require specific flags to be enabled.
I had a situation where some software running and then instantly crashing. Some digging later and it turned out it’s kernel driver was failing to load due to a SIGILL, which turned out to be a specific instruction in a crypt library it was using. It was a matter of googling <instruction_here> cpu flag and I was able to find the culprit.
Networking
After years spinning up my own shoddy initramfs based QEMU VMs through bash scripts, I learned to stay clear of any kind of networking. It just never panned out. Luckily, I can say the absolute opposite for UTM. For me, it just worked.
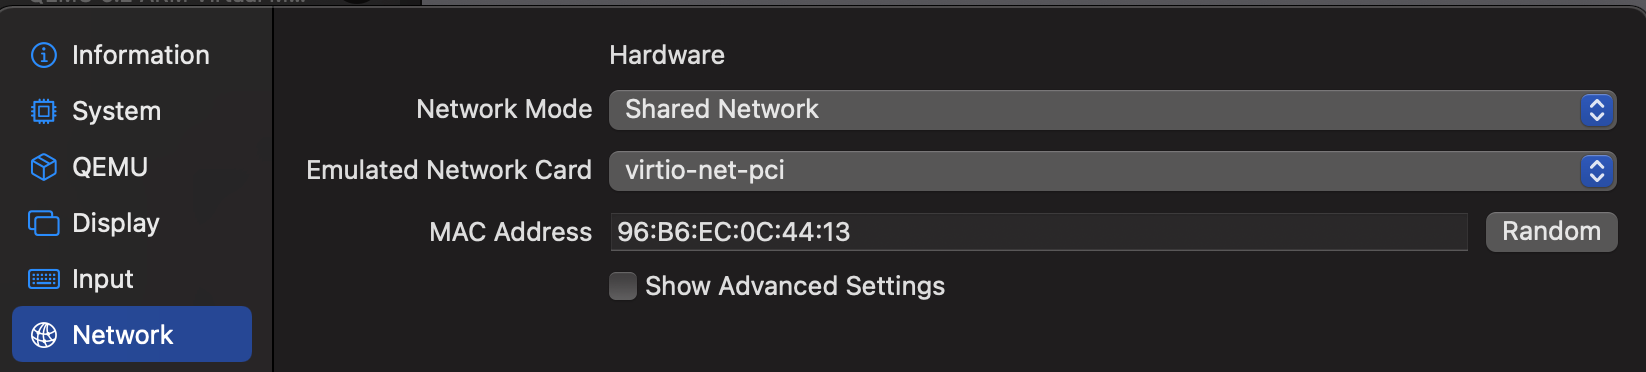
All of my VMs are configured with the “Shared Network” network mode, in the VM settings -> "Network", with the virtio-net-pci card. With this setup, each of your guests can access the internet like a classic NAT setup, with the added bonus of a bridge on the host which will allow all your guests (and host) to communicate to one another.
Kernel Debugging with GDB
The process of setting this empire up, let alone my job, required being able to do some kernel debugging on my guests. Like other virtualisation software, QEMU provides a gdbstub which will act as a gdb server on your guest, allowing you to connect remotely and debug the guests kernel - it’s pretty neat
Host-Guest
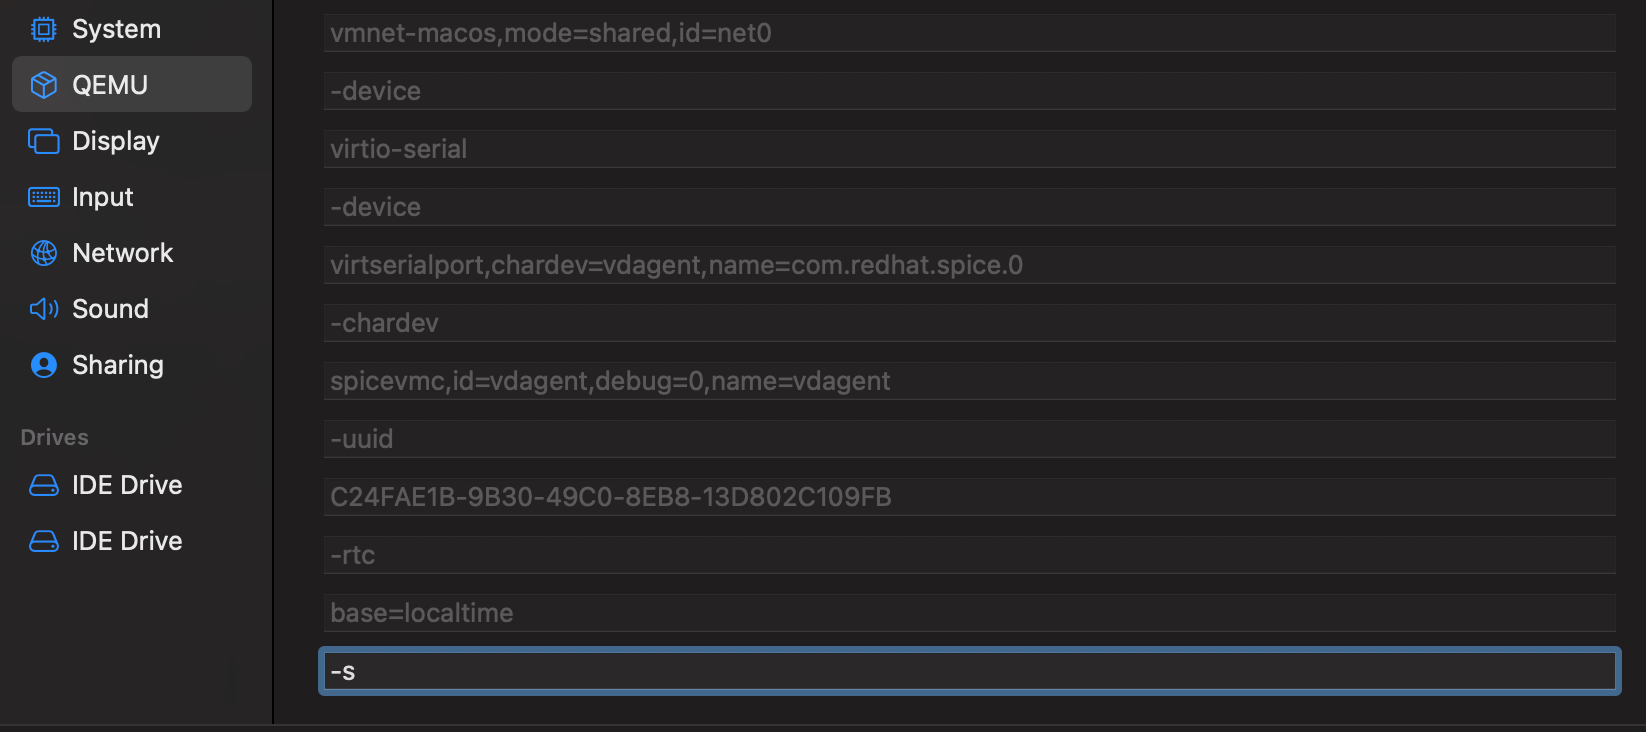
It uses the exact same arguments as QEMU, if you’re familiar with that, so we just need add the -s[1] argument to our guest and it’ll set up the gdbstub on your GUEST to listen on localhost:1234 on your HOST.
To do this we go to VM settings -> "QEMU". This section will show you how your configuration and settings translate into QEMU arguments. If we scroll to the bottom there’s an input labelled “New” where we can add our own. Pop in -s and we’re good!
Now, if we open the terminal on our MacOS host and start gdb w- just kidding, gdb doesn’t have a build available for M1’s at the time of writing. But you CAN use lldb to connect to the remote server currently listening on localhost:1234 if you’re so inclined, otherwise…
- QEMU users might be used to
-s -S, where the-Swill tell QEMU to not start the guest until you tell it to via gdb; this is already in use by UTM as far as I can tell, so we just make do without
Guest-Guest
Ew, lldb right?! If you want to be able to debug a guest from another guest, in my case I want to be able to use gdb on my dev guest to debug one of my research targets.
Fortunately, it’s not much work. As I mentioned above, the QEMU -s setups a gdbstub to listen on localhost:1234. This is because it’s an alias for the command -gdb tcp:localhost:1234. So all we need to do is change localhost to the bridge interface our host uses to communicate with the guests.
ipconfig -a on your MacOS terminal will show you all your interfaces and you should see bridge100 or similar with an IP address ending in .1 that matches your guest LAN. For me this is 192.168.64.1; my guests can reach my MacOS host via this IP. So this is where we’ll set up our gdbstub to listen, like so:
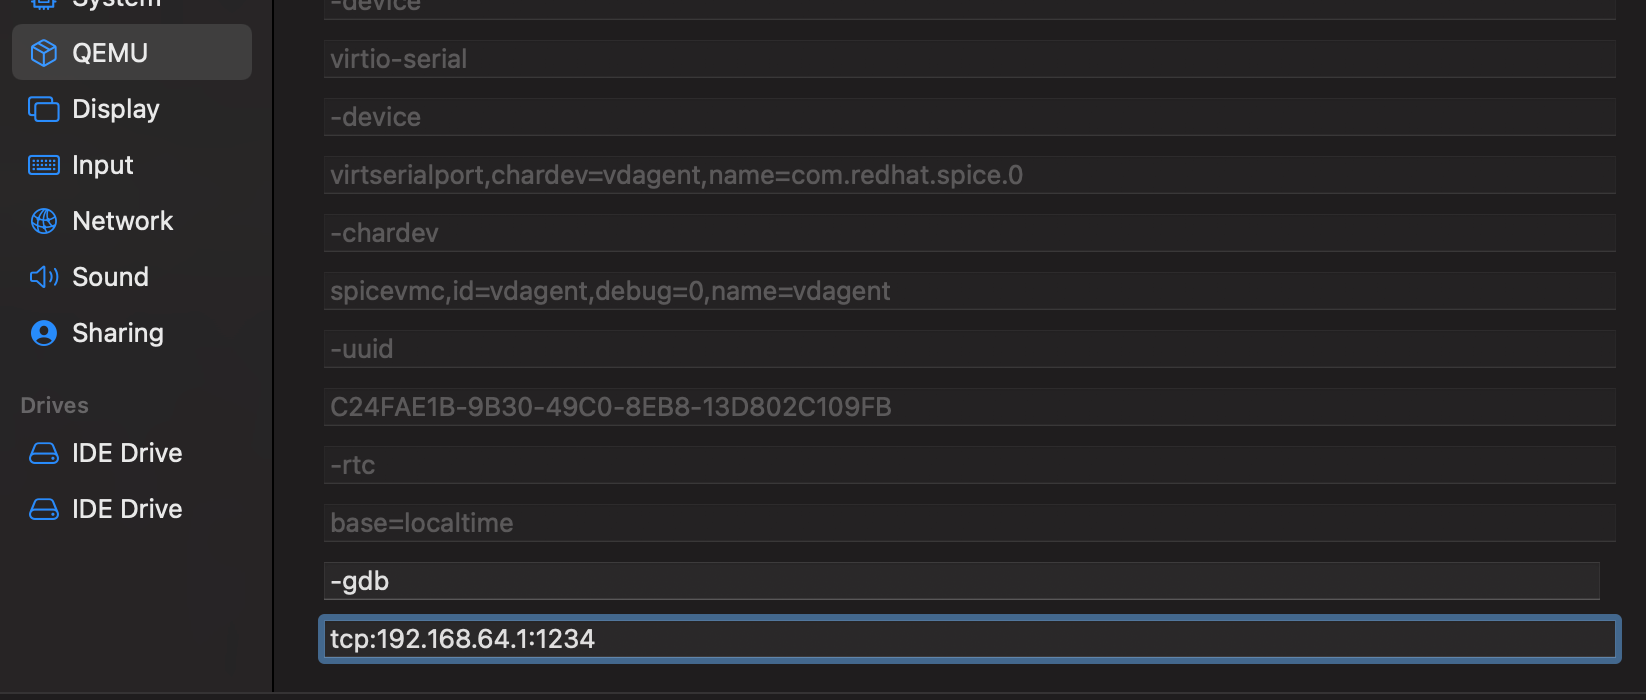
Now from my dev VM I’ll be able to access the listener, allowing me to debug any other guests on the shared network, neat! I can do this in gdb with the following command:
(gdb) target remote 192.168.64.1:1234
Also, No GDB on HVF
Remember I said something about the grass not being so green? Well, hvf (QEMU’s accelerator that uses Apple’s hypverisor framework) doesn’t support breakpoints (hardware or otherwise) via the gdbstub as of the time of writing (version 6.2.0 is used by UTM currently).
This means that whenever you want to debug (with breakpoints) a guest, regardless of the architecture, you need to make sure you go into "VM settings -> "QEMU" and uncheck "Use Hypervisor". Yep, it’s going to be slower, but it won’t be forever.
Resizing Disks
Something that might come in handy for some is knowing how to resize your guests’ disks, without having to attach a new one and go through that whole rigamarole.
For this you’ll need to use QEMU in the terminal and I couldn’t immediately find any binaries UTM might be using in their package, so I installed it via Brew, using brew install qemu - fairly straightforward.
- The command
qemu-img resize ~/Library/Containers/com.utmapp.UTM/Data/Documents/<YOUR VM>.utm/Images/disk-0.qcow2 +10Gwill allow you to extend your VMs disk by 10GB.- Make sure you choose the right VM folder and disk!
- Depending on your guest OS, you’ll likely need to do some additional tinkering to get the system to use the additional space, typically by extending the partition or logical volume
- E.g. for extending LVM, you can follow this guide
Conclusion
And that’s pretty much it! As you can see it’s not a particularly hands-on process, it just takes a bit of research and knowing what to use and what workarounds to take. If there’s any additional gotchas or tips I stumble upon, I’ll add them to this post.
I’ve no doubt the ecosystem and support for Apple silicon will only improve and honestly I’ve been impressed by the speed the open-source community has adopted it.
exit(0);